Using Jupyter Labs On The VHPC
Warning
The ksu-jupyter-lab command on the VHPC works differently than the same command on the HPC. A lot of options are different.
Overview
Jupyter Lab is a web application for creating and sharing documents that contain code, visualizations, and text. It can be used for data science, statistical modeling, machine learning, and more.
Initial Configuration
Before starting this procedure, look at the page on creating generic conda environments.
To begin, you'll need to load the most recent Miniforge3 module to get all of the python tools:
[barney@vhpc ~]$ module load Miniforge3
Now we create a directory for jupyter to use for some of it's internal stuff:
[barney@vhpc ~]$ mkdir -p ~/.runtime
[barney@vhpc ~]$ export XDG_RUNTIME_DIR="~/.runtime"
Then, create a new conda environment. In this case, we'll call it myJupyter:
[barney@vhpc ~]$ conda create -y -n myJupyter -c conda-forge python=3.9 jupyterlab
[barney@vhpc ~]$ conda activate myJupyter
If you need to add additional python packages, install them now. For instance,
[barney@vhpc ~]$ conda install -n myJupyter humanize
will install the humanize package, which is useful for converting large numbers (like large file sizes) to more human-friendly values.
Using ksu-jupyter-lab
To start a remote Jupyter Lab on one of the compute nodes, run the following command:
[barney@vhpc ~]$ ksu-jupyter-lab
This will start a Jupyter Lab job on 1 node, with 1
processor for 1 hours. If more resources are required for
the job, you can configure the job with the available command-line
options. You can run ksu-jupyter-lab --help to see the available
options:
[barney@vhpc ~]$ ksu-jupyter-lab --help
Launches a SLURM-backed Jupyter Lab instance and prints tunnel instructions.
Usage: /usr/local/bin/ksu-jupyter-lab [-n|--nodes <arg>] [-t|--tasks-per-node <arg>] [-q|--queue <arg>] [-g|--(no-)gpu] [-m|--memory <arg>] [-e|--email <arg>] [-s|--mail-types <arg>] [-w|--walltime <arg>] [-C|--conda-module <arg>] [-c|--conda-env <arg>] [-M|--modules <arg>] [-A|--account <arg>] [-T|--tunnel <arg>] [-h|--help]
        -n, --nodes: Number of nodes (max 2) (default: '1')
        -t, --tasks-per-node: Tasks per node (max 48) (default: '1')
        -q, --queue: Queue/partition name (default: 'defq')
        -g, --gpu, --no-gpu: Request GPU (off by default)
        -m, --memory: Memory per node (default: '5G')
        -e, --email: User email for SLURM notifications (no default)
        -s, --mail-types: SLURM mail types (default: 'BEGIN,END,FAIL')
        -w, --walltime: Max walltime HH:MM:SS (default: '01:00:00')
        -C, --conda-module: Miniforge module to load (default: 'Miniforge3/24.1.2-0')
        -c, --conda-env: Conda environment to activate (default: 'myJupyter')
        -M, --modules: Extra modules to load (space-separated) (no default)
        -A, --account: SLURM account to charge (no default)
        -T, --tunnel: Tunnel type (ssh, mobaxterm, bitvise, newssh) (default: 'ssh')
        -h, --help: Prints help
For example, to run a 3-hour Jupyter Lab job, using the myAcct account, with access to 1 node, 16 cores, and 1 GPU, for 4 hours, we could run the following command:
[barney@vhpc ~]$ ksu-jupyter-lab -A myAcct -n 1 -t 16 -g -w 4:00:00
By default, the ksu-jupyter-lab command tries to
use a conda environment named myJupyter. You can specify
a different conda environment to use, add the --condaenv
<CONDA_ENVIRONMENT> option when starting your job.
Note
<CONDA_ENVIRONMENT> should be the name of the conda environment you want to use. For instance, to use the conda environment we created above, you would use the following command:
[barney@vhpc ~]$ ksu-jupyter-lab --condaenv myJupyter
You can also specify the Miniforge3 environment module that
you want to use by adding the --conda-module <MINIFORGE3_MODULE>
option when starting your job.
Note
<MINIFORGE3_MODULE> should match the full name of the Miniforge3 environment module to be used (e.g. Miniforge3).
The full list of available Anaconda environment modules can be seen by running:
[barney@vhpc ~]$ module avail
Once you run the command, it will output something similar to the following:
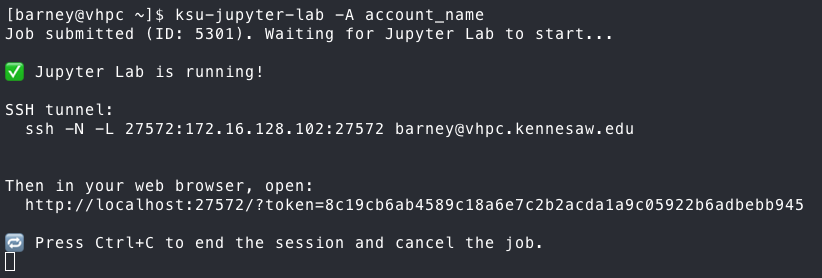
To connect to your Jupyter Lab, you need to establish port-forwarding through a new SSH session. The command to do it,
using the OpenSSH client is given in the output. If you are using another client, such as MobaXterm or the Bitvise SSH
client, you can run ksu-jupyter-lab with the -T mobaxterm or -T bitvise for instructions more tailored for those applicaitons.
Important
The port and compute node combination are unique to your job, so make sure that you use the values provided by the script.
Now, open a web browser on your local machine and copy and paste the URL with token into the address bar.
Important
The URL and token are unique to your job, so make sure that you copy the correct link from the text.
Once connected to your Jupyter Lab, you can start a new kernel or open an existing lab.
Congratulations! You are now running a Jupyter Lab on the cluster.
Finishing Up
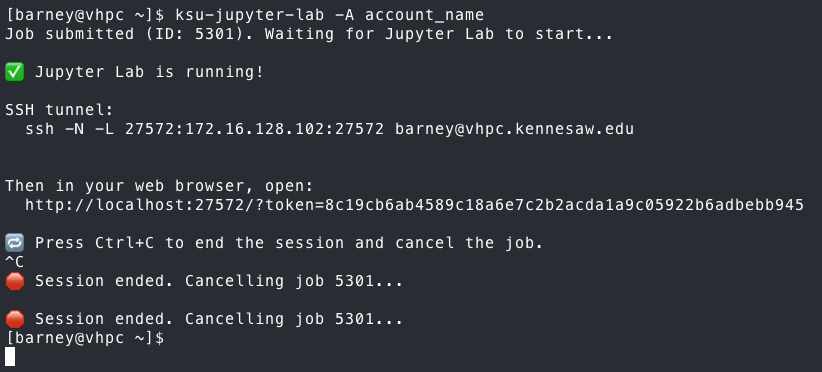
Once you are finished, press the Quit button at the top of the
Lab to quit the running kernel (if it's available), then close
your browser and log off of the system. Go to the window that
has the ssh command for the port forwarding, and hit Control-C
to end that session, then come back to the ksu-jupyter-lab
script and hit Control-C to end the Jupyter Lab session. In most
cases, exiting the script will kill the job, but you can verify
it by running the following commands to clean up, just in case:
[barney@vhpc ~]$ squeue -o "%.9i %.12P %.25j %.8u %.2t %.9M %.5D %.20R" --me
    JOBID    PARTITION                      NAME     USER ST      TIME NODES     NODELIST(REASON)
     5301         defq               jupyter_lab   barney  R      6:07     1                 g002
[barney@vhpc ~]$ scancel 5301
Acknowledgments
Some of this information was adapted from the Georgia Institute of Technology's Partnership for an Advanced Computing Environment documentation for Running Jupyter Labs Interactively.